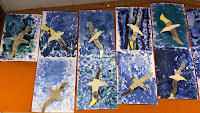
To tie in with our inquiry into Water this term we wanted to explore some of the creatures that live in and around the water.
We settled on an Albatross to explore for our art as it provided lots of different aspects we could bring together.
We started by sketching an Albatross 4 times to practise our technique. We used a 4 part sketch where each sketch is made with different information.
The 1st sketch is what you think an Albatross looks like
The 2nd sketch we looked at pictures of an Albatross
The 3rd sketch we took feedback from a buddy. We shared something we liked and something we though they could try on their next sketch
The 4th sketch was made bringing all the elements together for an ultimate Albatross


Next we traced around an Albatross to use for our final art piece. Then we carefully cut around it and finally added detail like the shading on it's wings and the nostril hole, eye and beak.


The last stage was to make our background. We first experimented with colour mixing by adding white paint to blue to gradually make it lighter. We used sponges to dab our paint and added many layers to give our ocean a sense of movement and texture.
 After folding a spring by weaving to pieces of paper, our Albatross were ready to take flight. Here they are soaring above our heads in the classroom.
The whole process came together over many days and I think you will agree when I say they look amazing.


No comments:
Post a Comment